last updated
Thursday, March 24, 2016
| A |
Air condenser |
| B |
Jacketed condenser |
| C |
Centrifuge tube, 15mL |
| D |
Drying tube |
| E |
Hickman distillation head |
| F |
Connecting adapter |
| G |
Claisen adapter |
| H |
Spin vane, triangular |
| I |
Syringe, polyethylene |
| J |
Flask, pear-shaped, 5 mL |
| K |
Flask, round-bottom, 10 mL |
| L |
Micro conical vial, 0.1 mL |
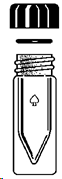
| M |
Micro conical vial, 3 mL |
| N |
Micro conical vial, 5 mL |
| O |
Thermometer adapter |
| P |
Compression cap, 20-400 |
| Q |
O-ring (EP, size 112) |
| R |
Septum, PTFE/silicone |
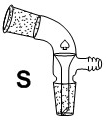
| S |
Vacuum adapter |
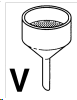
| V |
Büchner Funnel |
| W |
Hirsch Funnel |
| X |
Neoprene adapter |
|
 |
|
|
    X
X |
1. Cleaning of Glassware
Since every student has a limited amount of glassware, good housekeeping is very important. The workspace has to be kept organized and free of clutter i.e., paper towels, etc. for safety reasons and to increase efficiency in the lab.
There are various ways to clean glassware properly. The best policy is to clean the glassware immediately after
its use. This way it is usually easier and everybody is exposed to fewer chemicals as well. Like in real life, letting the dirty dishes sit around in the sink for a week does not make it any easier to clean them, and often they start to smell bad as well due to food residues that go bad. In the lab, in many cases soap and a brush will do just fine to accomplish this task.
Often, it is advisable to use acetone first to rinse out the majority of the organic material before applying water and soap. Note that the acetone has to be collected in the organic waste container and does not go down the sink! In more difficult cases, acids or bases have to be used for cleaning. If a lubricant was used, the joints have to be degreased thoroughly as well using a non-polar solvent like petroleum ether or hexane.
In the end, the glassware should be rinsed with deionized water (if available), a little acetone and then briefly dried in an air stream (Make sure to check the air supply first. Sometimes the line contains liquids
i.e., oil, water,etc. as well!). Even though it is relatively important
to have reasonably clean glassware, it should not take too long to get
it. In other words, the student cannot spend an hour on cleaning,
because he will run into problems later on to finish the experiment in a
timely fashion. The student is the lab to conduct experiments and not to
clean glassware for the better part of the time.
2. Lubrication or not?
|
Many of the joints do not perfectly match. In most cases, lower yields are due to these small leaks.
The impact of this problem can be reduced by placing an O-ring and a compression cap on the top of the joints to provide a better seal. Note that this only works with the flask that have a thread on the top!
|
In applications that are more critical high-vacuum grease has to be applied to the joints to provide a better seal. Both connecting joints also have to be cleaned properly before being lubricated. A small amount on the top part of the male joint is usually sufficient (If the male joint is rotated inside the female joint, and the top part is clear all the way around, enough grease was applied). Excessive amounts of grease do not necessarily provide a better seal. It often ends up in the product because it dissolves relatively well in most organic solvents i.e., diethyl ether, THF, hydrocarbons, etc. It also can cause many problems in the purification of the crude product as well, particularly if the product is a solid. Its exposure to the solvent has to be minimized as much as possible. Therefore, it should be used sparingly and in the right places, and only if it is necessary i.e., vacuum distillation, etc.
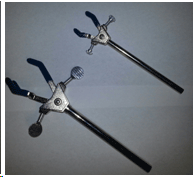
3. Clamping
The clamping serves the purpose to support the setup appropriately. There are two basic clamps in the lab: one for 14/20 joints and microscale equipment (upper clamp), and the one for 24/40 joints (lower clamp). While there are larger clamps than the ones shown in the picture available, they are usually not useful for the size of glassware used in these organic laboratory courses. It is very important that the clamp that is used has to be of proper size and placed in the proper location.
Here are some basic rules:
a. The prongs have to be covered with plastic/rubber/cork. The metal of the clamp should never have direct contact with the glass. This will reduce to chances to destroy the glassware upon clamping due to over tightening. If these ‘buffers’ are missing, a small piece of Tygon or rubber tubing can be used to cover the metal prongs.
b. A flask should never be clamped at the bulb because this will lead to a very weak connection or breakage. A flask is clamped at the joint which is comprised of thicker glass than the rest of the flask.
c. While the support of the setup is needed, the use of too many clamps causes problems because it becomes difficult to prevent strain on the setup. Usually, one or two clamps in the proper positions are sufficient to support the kind setups used in these labs.
d. It is also important not to over tighten the clamp to prevent the breakage of the joint and the bending of the prongs, which ultimately causes the prong to break as well. In addition, the screws that control the distance wear out making it more difficult to move them afterwards.