alpha:~/tutorial/h2co> emacs h2co.cntl |
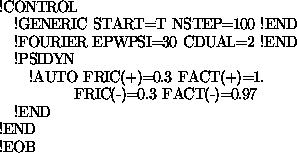
The program reads in this file at startup. Let's quickly look at what some of the parameters mean. Setting START to true states that this is a new, and not continuing calculation. NSTEP is the number of timesteps for which to run the calculation. EPWSI is the planewave cutoff energy for the wavefunctions, in Rydberg. CDUAL is the factor by which EPWSI is multiplied to set the planewave cutoff energy for the charge density. PSIDYN is the dynamics of the wavefunction. FRIC sets the friction for when the the energy increases (+) or decreases (-), which is then multiplied by FACT each timestep.
The format the input parser recognizes is a block. Blocks of data or parameters are usually entered in the form !KEYWORD PARAMETER1 = value PARAMERTER2 = value ... !END. I guess they could be blank, for if you wanted to make some generic template control file, but many keywords have mandatory parameters. Also, there is another facility which we will see later for making blocks invisible to the program.
Notice that some of the parameters are not capitalized. The input file parser is only case sensitive to: (a) the !EOB (b) unix paths and filenames. Also, if you want to specify floating point precision for integers, just put a period after the number. There is no built-in facility for comments, but you can probably use some non-conflicting keyword block, if you like.